Welcome to PHS Learning Management System Moodle
Moodle is our new Learning Management Solution. We use Moodle in order to do more online interaction between teachers and students.
Moodle is a platform for online learning that enables teachers to create e-courses, add assignments, and keep an eye on your students’ progress. It also allows you to communicate with the students and encourage communication between them in forums and discussions.
In Moodle, a teacher has responsibility for the materials in their own course. The IT department manages all the operations in regards to setting up a configuration, adding courses, adding teachers and students, authentication and enrollment.
The purpose of using Moodle is to help PHS teachers and students for better interact virtually while fulfilling the curriculum requirements.
In cases when PHS is required to do its school’s operation virtually Moodle will be our main LMS solution for Online School.
Any Moodle related tasks, questions or issues should be addresses with IT Department through [email protected]

How to login to Moodle
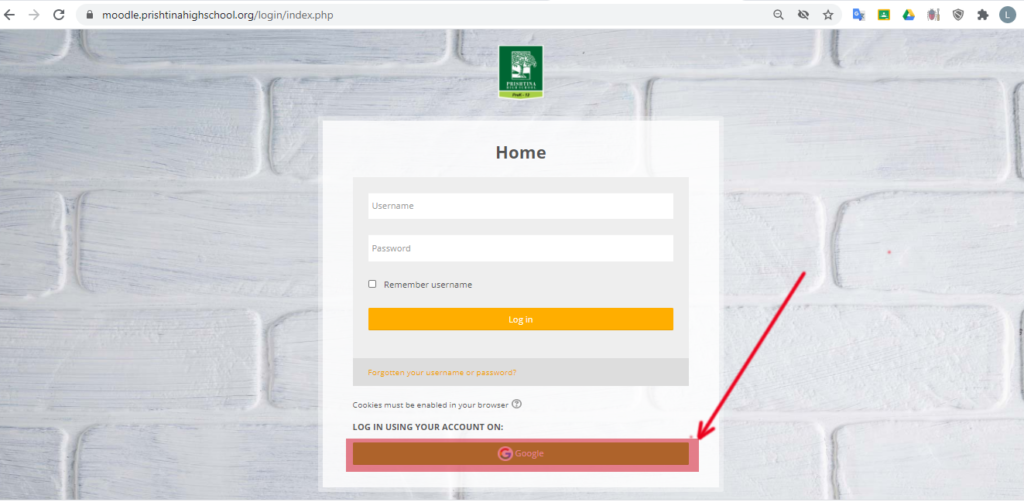
Note: Do not bookmark the Web Login page. To bookmark Moodle, use moodle.prishtinahighschol.org
2. Enter your email address and password and click next.
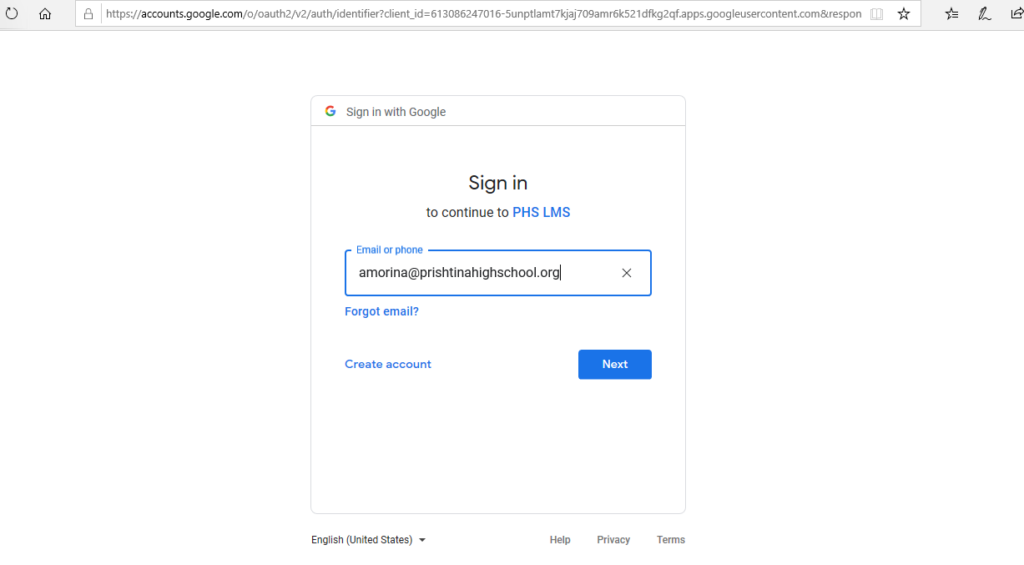
If you login for the first time, after you enter credential you will receive a link in your email to confirm. After you confirm that link, you can login in Moodle.
Students who cannot log in to Moodle should contact the IT Help Center via email address [email protected]
Find Your Courses
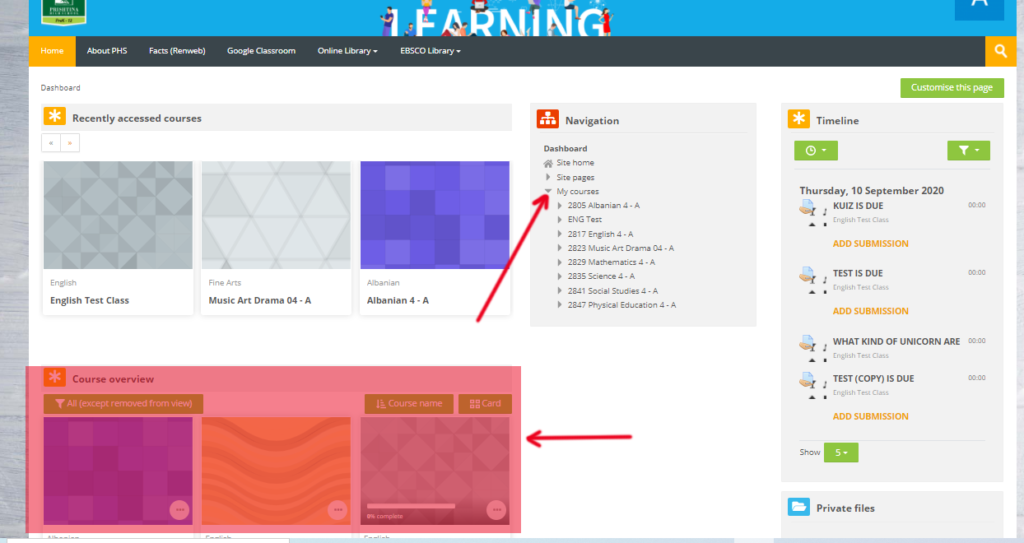
If you log in and do not see your course in this block:
- The course may not yet be open to students, so be sure to check again after the first day of class, or ask your instructor, or email IT Department [email protected]
Dashboard
Typical Course Layouts
Courses in Moodle are usually organized in two or three columns. These columns contain Navigation tray, blocks that are often customizable, and topics where your instructor will post content and assignments for your course.
Two-Column Layout
In most courses on a laptop or desktop computer, you will see a two-column layout. The center column is where your instructor will post information about the course, links to resources and assignments, and other activities you will be doing on Moodle. This main course content is contained in expandable Sections , which may be organized by week, or by topic.
You can use Navigation tray (on the right side) and Blocks (on the right side) to navigate in Moodle, see upcoming assignments, see calendar, link to library resources, and more, depending on what your instructor has added to the course.
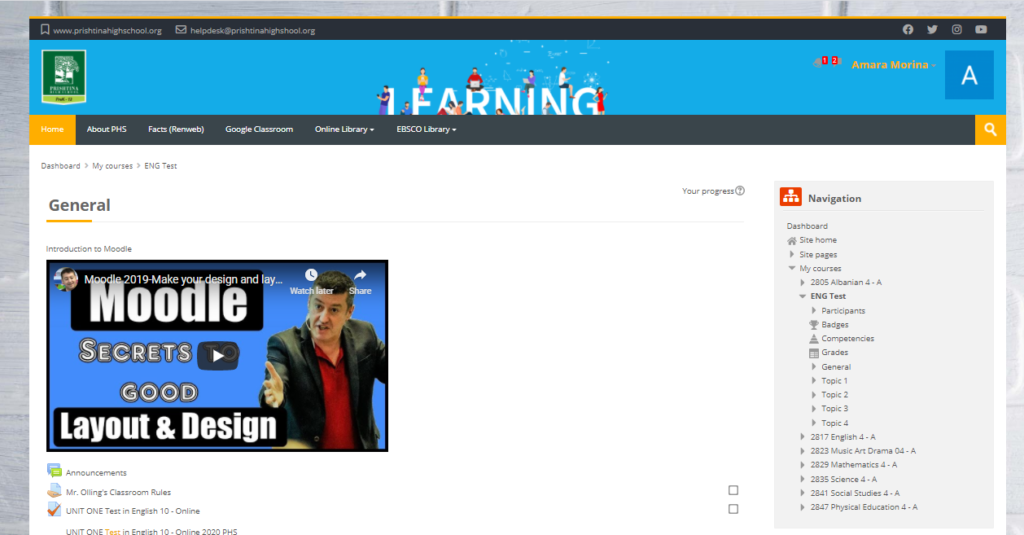
In addition, you have an option to customize this page based on your needs.
Mobile Layout
On smaller screens such as a phone or small tablet, the page layout will rearrange for easier viewing: Blocks (Resources, Activities, Calendar, etc.) will move to the bottom of the screen below the main course content.
Submit an Assignment in Moodle
For example:
- Your instructor can control whether you can make only one submission or upload files after deadlines have passed and if you can re-submit files or not.
- Some assignment types let your instructor return a submission with comments for revisions. You can then upload your revisions by returning to the link for the assignment.
- Assignments can be for “offline” activities such as a classroom presentation or printed paper, in which case you will not submit anything on Moodle, but your instructor may use the Moodle assignment for grading and feedback.
Submitting an Assignment
You may be asked to attach files or enter text directly into a text box.
Note: If your instructor is asking you to upload a file, they should inform you what file format you should submit (eg., .pdf, .doc, .pptx or .docx).
- Links to assignments can always be found in the sections down the center of the Moodle course page. If your instructor has added the Activities block to the course, you can also locate assignments by clicking the Assignment link in the Activities block, which can usually be found on the right side of the Moodle course page.
- Select the link to the assignment. The Assignment page will open, showing instructions and your submission status (due date, grading status, time remaining, grade, etc.) for this assignment.
- Select Add submission. The Assignment submission page will open. Depending on how your instructor set up the assignment, you may have the option to submit file(s), enter text in a text entry box or both.
- To enter online text, type directly into the Online text box. Alternately, you can compose your submission in a word processing program and then cut and paste the text into the Moodle text box.
- When pasting text into Moodle, for best results, paste the content as unformatted text.
- For spell checking to work, it must be enabled in your browser. Once enabled, to see spelling suggestions press and hold the Control key on your keyboard and click OR right-click on your mouse (whether you are using a Mac or PC system will determine which operation will work).\
- To submit a file using drag-and-drop:
- Arrange your computer desktop windows so that you can view both your browser window and your files on your computer (e.g., in an open folder or on your desktop).
- Drag files from your computer and release them on top of the big blue arrow in the Files area.
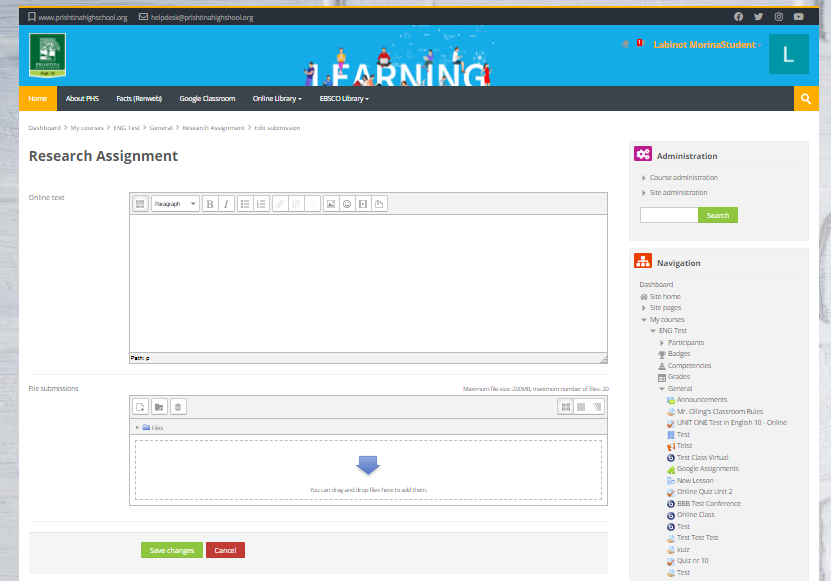
Note: DO NOT drag-and-drop a .gdoc file from a Drive App desktop window into Moodle. Your instructor will not have permission to view the file. Instead, use browse for the file (for details, see the next step), or save the file as a PDF before submitting.
To browse for a file:
- Under File submissions, at the top-left of the file area, click the Add… icon ( ). The File picker window will open.
- Select a file from your computer, or from Google Drive:
- To upload a file from your computer, click Upload a file (at left), then, below Attachment, select Choose file. Browse your computer and select a file, then click Open. The file name will appear next to the Choose file button.
- To upload a file from Google Drive, click Google Drive (at left). You may need to log in. Click the File to upload.
Note: When you browse to Google Drive, Moodle will convert Google docs (.gdoc files) that were composed directly in Google to a sharable file type (.rtf, .ppt, .xls, etc.)
- (Optional) If you want to rename your file in the File Picker, enter the new name in the Save as field, and make sure to include the correct file extension (.pdf, .doc, etc.) in the name so the file can open correctly for your instructor.
- Click Upload this file. The File Picker will close and an icon for your uploaded file will appear in the Files area.
- Once your file(s) appear(s) in the Files submission area, click Save changes.
Note: You should receive an email at your umass.edu mail address confirming you have submitted the assignment.
- If your instructor allows you to revise your submission, you’ll see an Edit submission button on the Assignment page. Select Edit submission to add or replace files, or edit a text submission. When you finish making changes, click Save changes.
- For some assignment types, you will see a Submit assignment button. To finalize your submission, click Submit assignment, then Continue.
Note: Once finalized, you will not be able to make any more changes.
- You can check under Submission status on the Assignment page to ensure your file is listed. You can also view feedback and grades from your instructor there.
- For some assignment types, you may have the option to submit several or an unlimited amount of attempts (or drafts) for a single assignment. Because each course is different, you will need to communicate with your instructors on how submission attempts and feedback are configured for each Moodle assignment.
Take a Quiz & Review Quiz Results
Take a Quiz
- Log in to Moodle and navigate to your course, then locate the link for the quiz you wish take.
- Quiz links will always be located within the Sections that are stacked down the center of the page.
- You can also access any released quizzes through the Activities block. Click the Quizzes link for a list of links to available quizzes for the course.
- Click the link to the quiz. The Quiz page will open showing a summary of information about the quiz. This may include:
- The grading method.
- The number of times you can retake the quiz (called “attempts”).
- The date range the quiz is available to take.
- The time limit for taking the quiz.
- To begin, click Attempt quiz now. A confirmation page will remind you of any time restrictions or limited number of attempts.
Note: If your quiz is interrupted, you can return to the quiz and click Continue the last attempt to resume your work, even if you lose your connection to Moodle, as long as the deadline for the quiz has not passed.
It is required to install Safe Exam Browser in your computer before you attempt QUIZ or Online Exam.
- Quizzes may have one or more questions per page. The way you answer each question may vary based on the question type. Please note:
- For multiple page quizzes, you can use the Quiz navigation panel (on the right) to move between quiz pages. The panel will show your progress as well as how much time you have remaining if your instructor set a time limit for the quiz. If free navigation is enabled by the instructor, you can use the Quiz navigation panel to move to another page or return to complete any unanswered questions. Completed questions will be highlighted differently from unanswered questions in the Quiz navigation panel.
- For some quiz and/or question types, you will need to click Submit to ensure your answer is recorded.
- For questions without submit buttons, enter your answers and click Next (on the bottom) to continue.
- When you have reached the end of a quiz, the Summary of attempt page will open. This page lists the quiz questions and indicates which ones have been answered. To return to a question for review, or to complete an unanswered question, click the Question number.
- Important! When you are satisfied with your answers, click Submit all and finish to finalize the quiz attempt.
Note: You will not be able to change any answers after you submit and finish the quiz attempt.
Review Quiz Results
Once your quiz has been graded and released by your instructor, you may be able to access a Quiz Review page where you can see quiz questions and your answers, view your score or grade and read instructor feedback. You can use this information to review questions you answered incorrectly or which you could not answer.
Online conferences by using Big Blue Button in Moodle?
To join a BigBlueButton (BBB) session click on the BBB link – as shown in the picture below:
- On entering the room, a message will appear asking if you want to use your microphone or just listen. If you choose microphone you will need to check your settings.
- The moderator can choose whether to allow participants to use webcams and microphones or not.
- The central area can display presentations, polls, screen sharing or an interactive whiteboard.
- There is also a chat option with public and private chat.
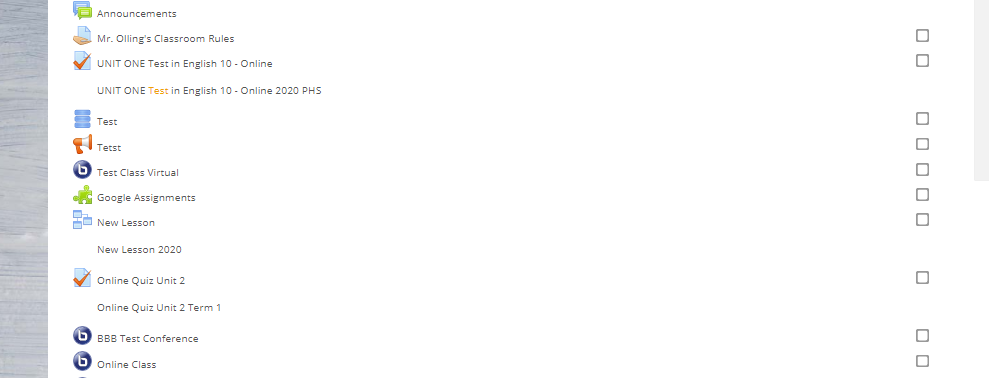
Click on Join session button or presentation button to view a previously recorded BBB session
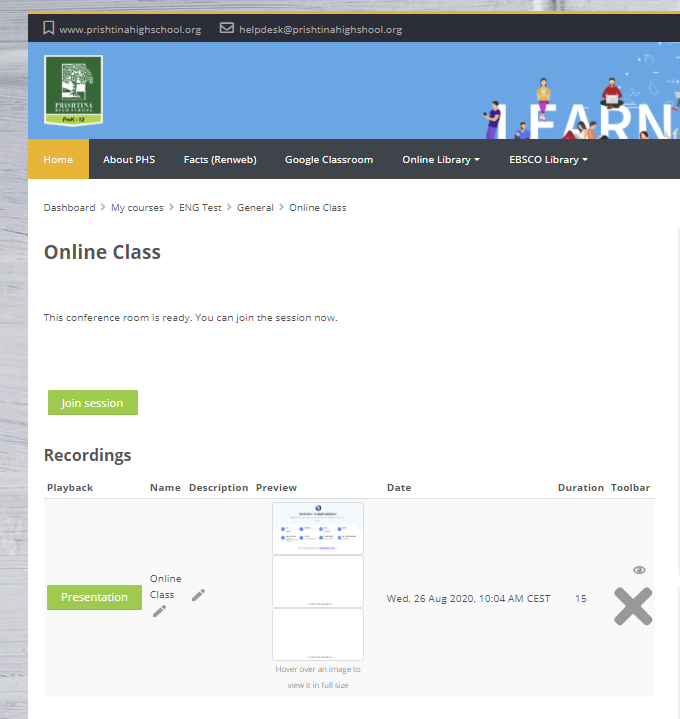
For any question related to Moodle, please feel free to contact IT Department via email address [email protected]
How to Logout from Moodle?
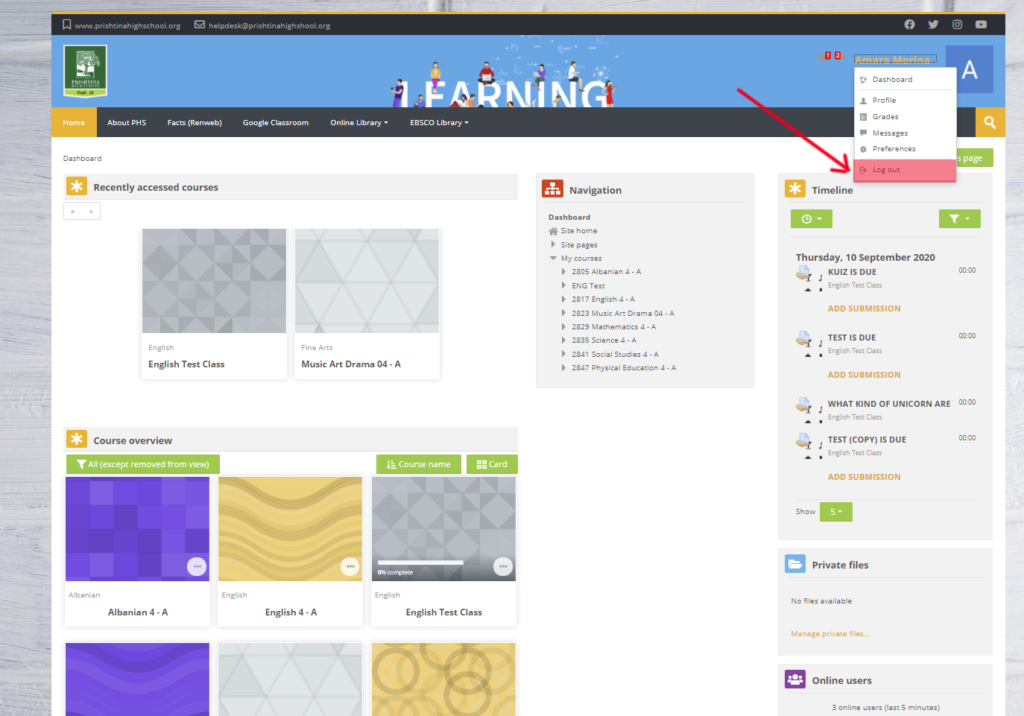
Note: Be sure to close your browser after you log out, especially if you are using a public or shared computer. This will ensure that no one else can access your Moodle account.
